Organiser handbook

Run the event from one desk.

Full manual for the organiser portal: every page, control, and how-to. Screenshots are captured from the real Organiser Platform UI. Production host: organiser.groove.com.na.

Audience Organisers and their teams Updated October 2026

Sign in

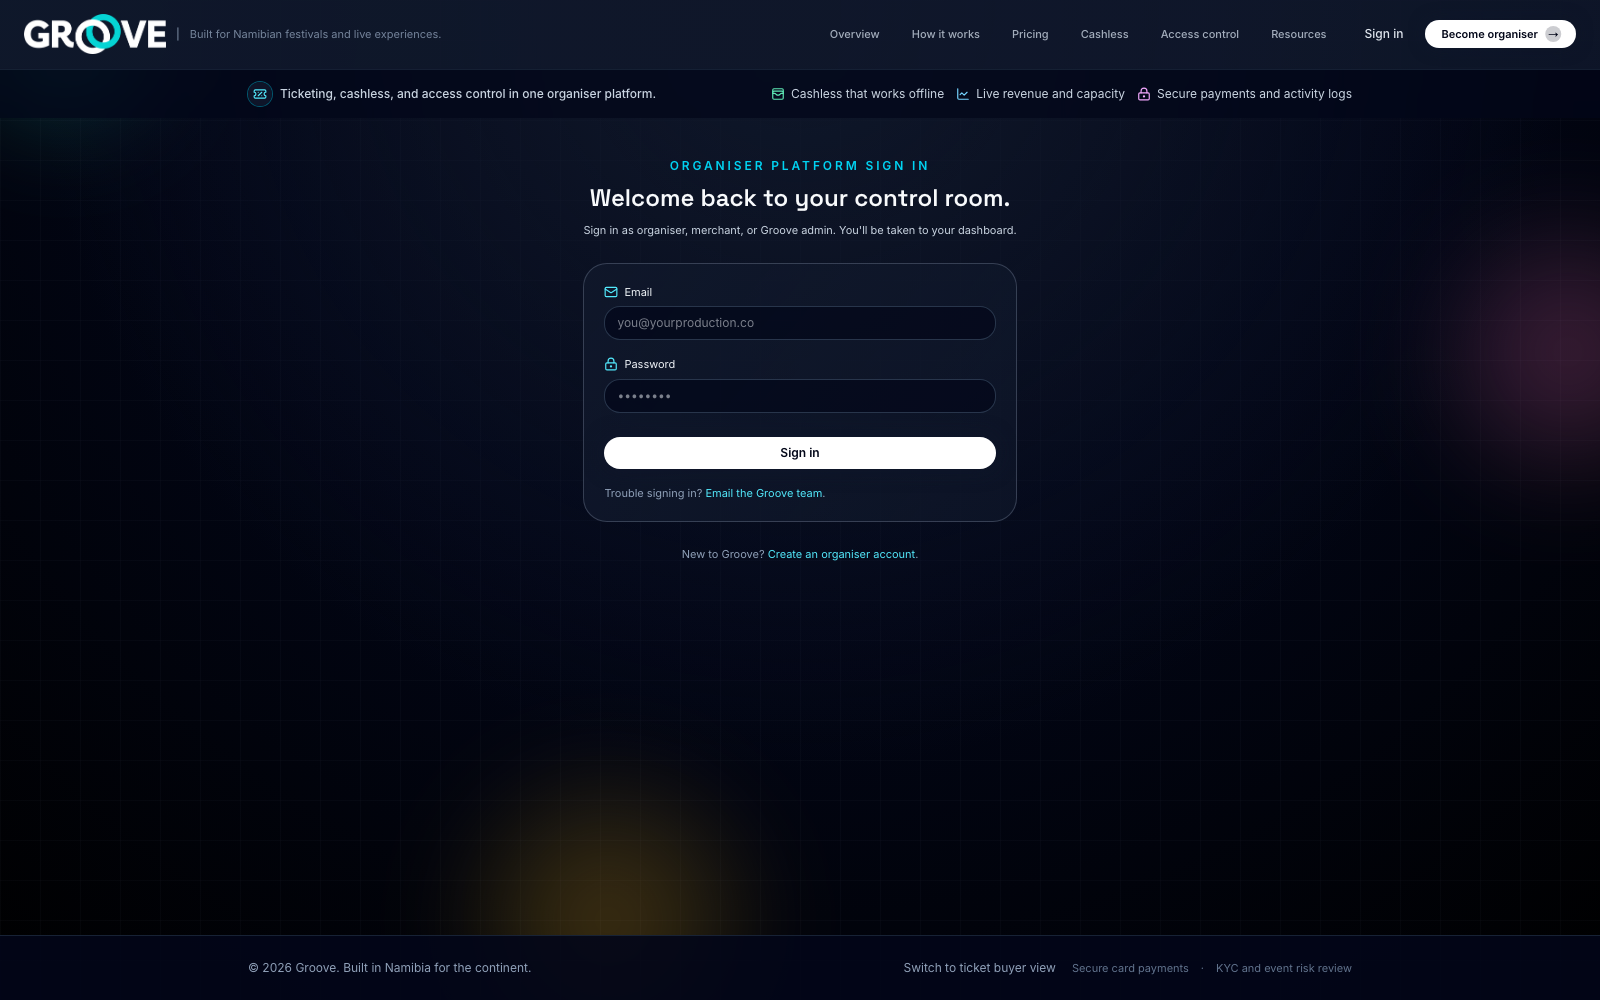
Open organiser.groove.com.na and choose Sign in. Use the email and password from your activation. Merchants and Groove admins can also sign in here; the portal routes each person to the right home.

Organiser Platform sign in page Sign in form
Sign in card under the hero. Eyebrow: Organiser Platform sign in. If you do not have a password yet, finish your activation email first.
  1. Activate first. After Groove approves your organiser application, open the activation link and set a password.
  2. Sign in with that email and password. Button label: Sign in.
  3. Land on Overview at /dashboard. That is your control room.
  • Trouble signing in? Use Email the Groove team.
  • New organiser? Create an organiser account goes to apply (/signup).
  • Optional query ?next=/path returns you to a deep link after login.

Apply and activate

Apply (/signup)

Eyebrow Become an organiser. H1: Apply for your organiser account. Three steps:

  1. You — full name, organisation name, legal entity (optional), work email, phone / WhatsApp.
  2. Events — what you run, genres, typical crowd size (Under 500 · 500 to 2,000 · 2,000 to 10,000 · 10,000+ · Not sure yet), home city, country, website, social.
  3. Review — summary, how you heard about Groove, confirmation checkbox, Submit application.

Activate (/activate/[token])

  1. Open the activation link from email.
  2. Set Display name and Create password (or use existing password if prompted).
  3. Click Enter organiser platform. You land on Overview.

Team invite (/team/invite/[token])

Teammates invited from Settings land here. Accept, sign in if needed, then join the organiser workspace with the role you were given.

Your desk (shell)

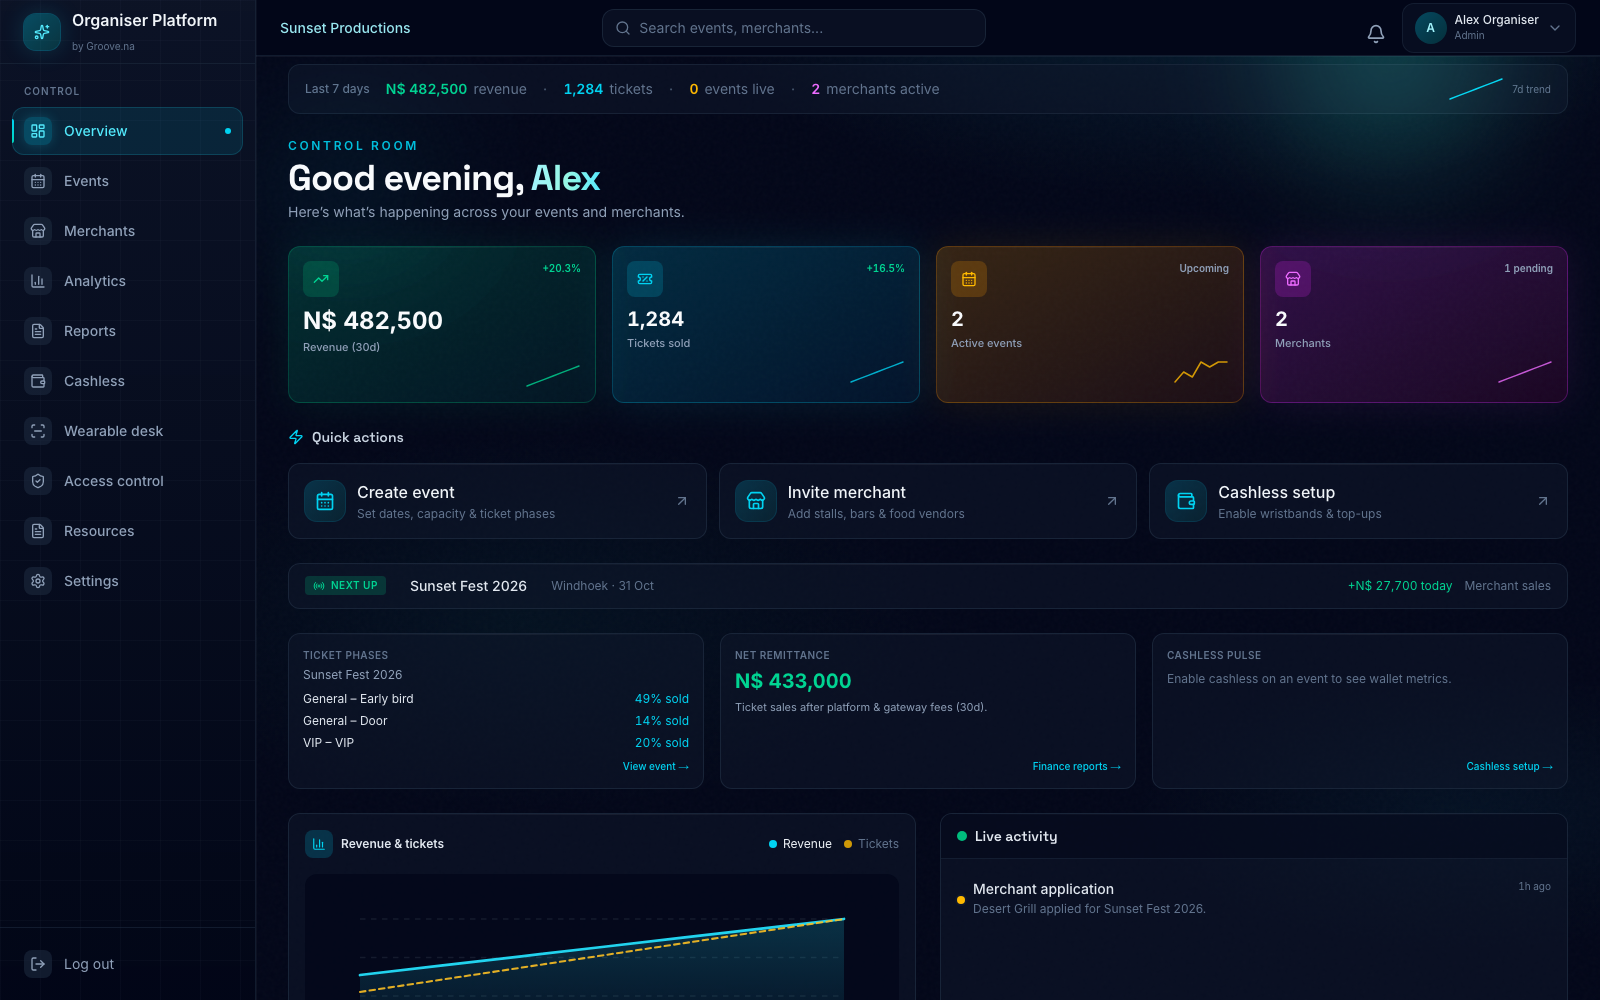
Every dashboard page shares the same shell: left nav branded Organiser Platform by Groove.na, header search, notifications, and profile menu. Items you cannot use are hidden. The API still enforces the same limits.

Organiser desk Overview with full sidebar 1 Control nav 2 Search 3 Control room
Real desk chrome. Sidebar section label: Control. Header search placeholder: Search events, merchants…
MenuPathWhat you do thereCapability
Overview/dashboardPulse check and shortcutsAlways
Events/dashboard/eventsCreate, edit, allocate, publishmanage_events
Merchants/dashboard/merchantsApplications, invites, live salesapprove_merchants
Analytics/dashboard/analyticsSell-through and velocityread_analytics
Reports/dashboard/reportsDecision reports and exportsview_payouts
Cashless/dashboard/cashlessWallet rules and fan walletsmanage_ops
Wearable desk/dashboard/wearable-deskBands, guest wallets, desk staffmanage_ops
Access control/dashboard/accessZones, gates, devices, rulesmanage_ops
Resources/dashboard/resourcesShortcuts into the tools aboveAlways
Settings/dashboard/settingsProfile, brand, team, prefsAlways

Header controls

  • Notifications — Live updates; Mark all as read; footer Review merchant activity.
  • Profile menu — Profile & settings · Help & resources · Performance insights · Sign out.
  • Log out also sits at the bottom of the sidebar.

Team roles

Admin

Full desk: events, merchants, money, ops. Invite carefully.

Operations (Ops)

Events, merchants, cashless, wearable desk, access, analytics. The floor without the bank account.

Finance

Payouts/reports and analytics. Reads the numbers, does not rewrite the lineup.

Viewer

Analytics only. Perfect for a partner who should see, not poke.

Invite teammates from Settings → Team & Permissions. Role labels in the header match Admin, Ops, Finance, Viewer.

Overview (Control room)

Path /dashboard. Eyebrow Control room. Greeting like Good evening, Alex.

  1. Scan the Last 7 days strip and KPI cards: Revenue (30d), Tickets sold, Active events, Merchants.
  2. Use Quick actions: Create event · Invite merchant · Cashless setup.
  3. Check the focus event (Live / Next up), ticket phases, net remittance, and cashless pulse.
  4. Read Live activity, then jump into upcoming events or Analytics/Reports.

Empty states you may see: No sales in this period · No recent notifications · No upcoming events scheduled · No phase data yet.

Events list

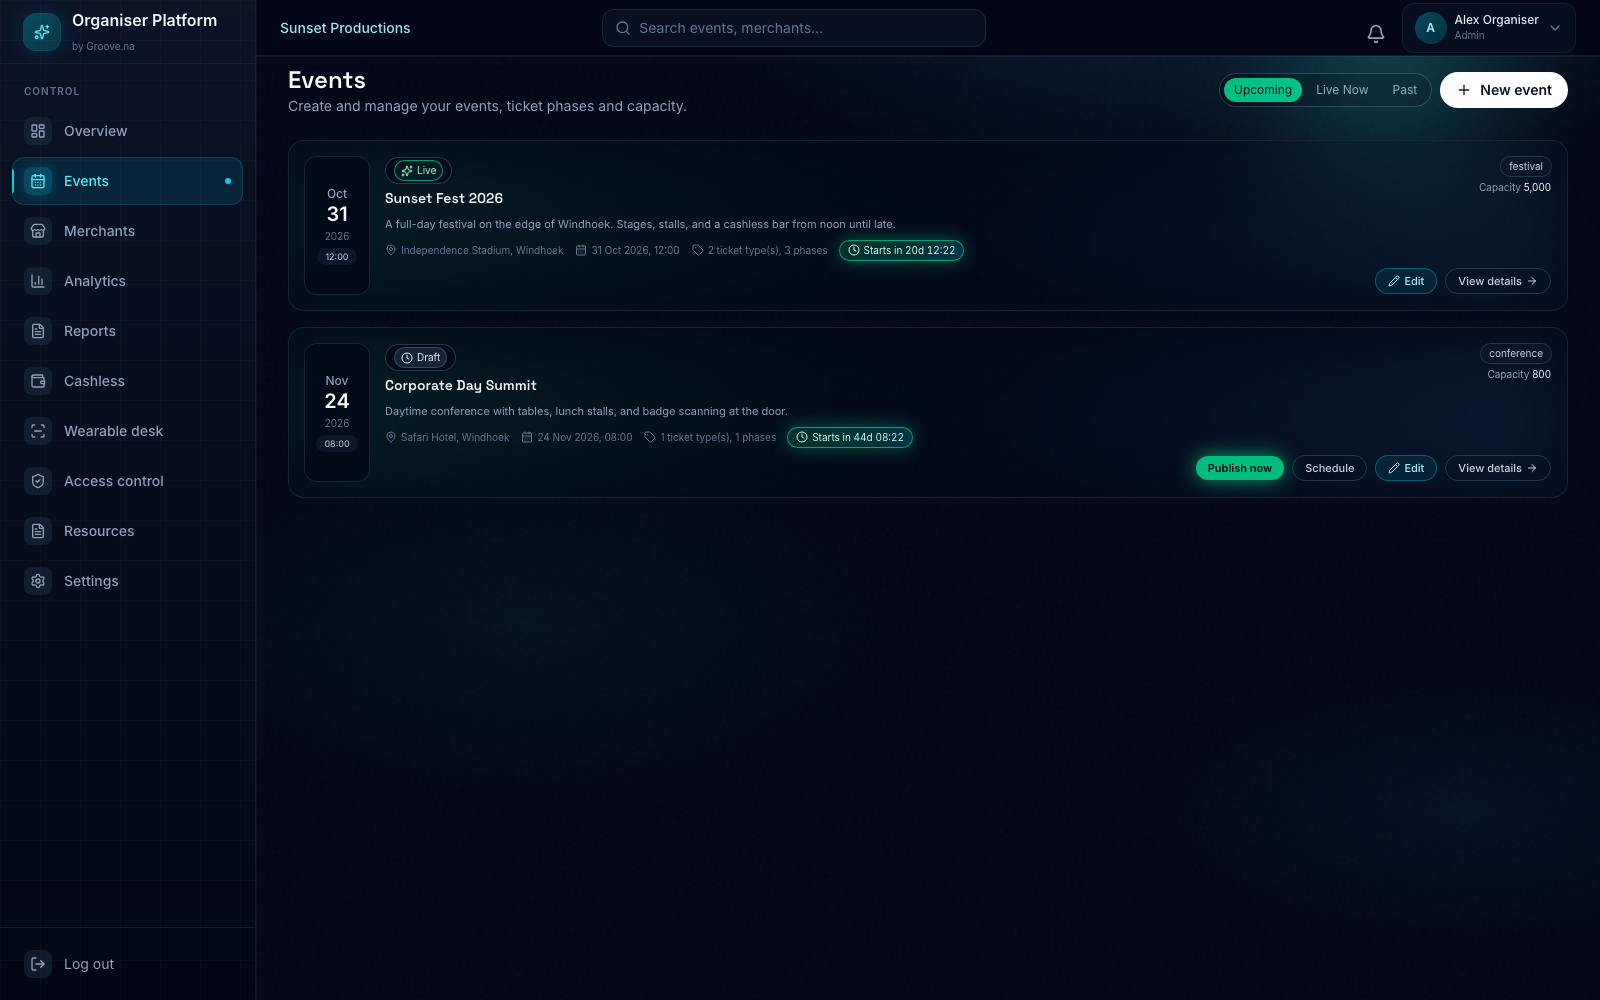
Path /dashboard/events. H1 Events. Subcopy: Create and manage your events, ticket phases and capacity.

Events list with Live and Draft cards New event Event cards
Filters: Upcoming · Live now · Past. Cards show Draft / Scheduled / Live, venue, capacity, ticket types.
  1. Filter with Upcoming, Live now, or Past.
  2. Click New event to open the editor, or Edit / View details on a card.
  3. For a draft: Publish now or Schedule (set go-live date and time, then Confirm).

Create an event

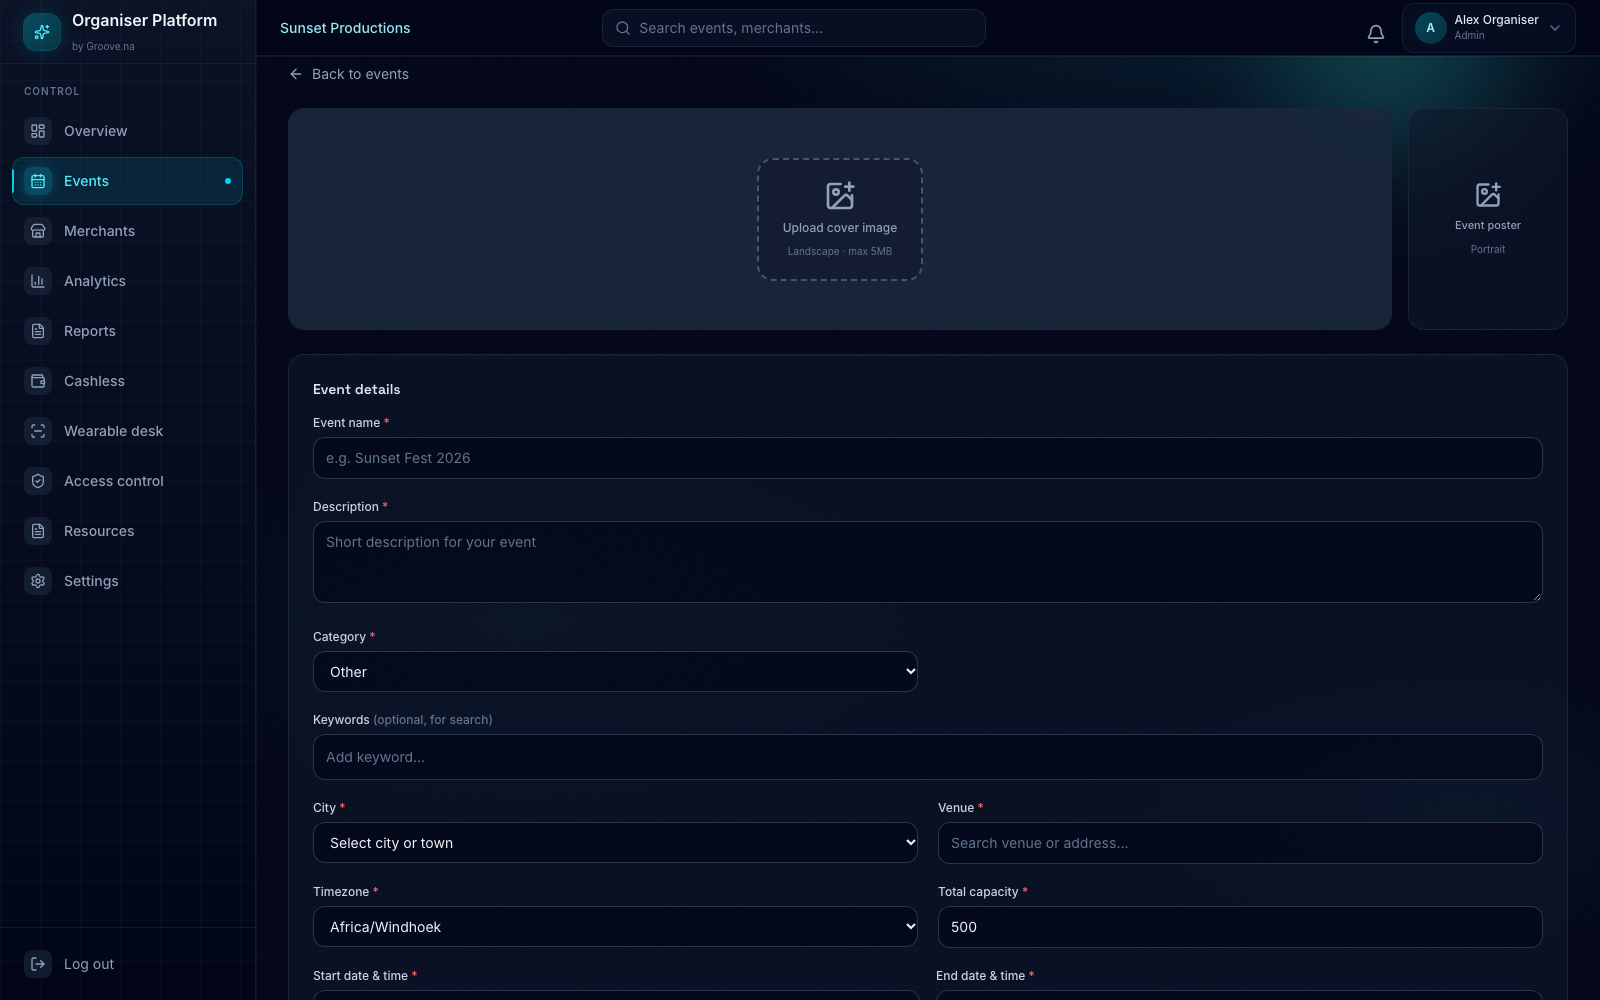
From Events, click New event (/dashboard/events/new). You get the real event editor: cover and poster on top, Event details below, tickets and extras further down. Primary action at the bottom is Create event (edit mode uses Save changes).

Create event screen with sidebar and cover upload 1 Sidebar 2 Cover image 3 Poster 4 Event details
Create event top of form. Cover is landscape for discovery cards. Poster is portrait for the detail page. Back link: Back to events.
  1. Upload a cover (landscape · max 5MB) and optionally an Event poster (portrait). JPEG, PNG, WebP, or GIF.
  2. Fill Event details (see required fields). Red stars mean required.
  3. Configure Ticket types with at least one type and phases that have a name and positive capacity.
  4. Optionally open Tables, Promos & discounts, Event sponsors, Lineup, Cashless event, Payment methods, Stalls & merchant spots, Merchants & stalls, Boost your event.
  5. Click Create event. A modal asks how you want to go live (draft, publish now, or schedule).

Required fields (and what they mean)

FieldRequiredWhat to enter
Event nameYesPublic title fans see. Example: Sunset Fest 2026.
DescriptionYesShort story for the event page. Keep it scannable.
CategoryYesMusic, Sports, Conference, Festival, Comedy, Arts, Family, Nightlife, Food, Other.
CityYesNamibian city or town from the list (for example Windhoek).
VenueYesSearch venue or address. With Maps configured, this also sets lat/long.
TimezoneYesDefaults to Africa/Windhoek.
Start date and timeYesWhen doors or the programme starts. Day events and evening events use the same fields.
End date and timeYesMust be after start. Multi-day or overnight shows simply cross midnight.
Total capacityYesHard ceiling. Sum of ticket phase capacities cannot exceed this.
KeywordsOptionalSearch tags. Press Enter or comma to add.
Sell tickets untilOptionalCustom sales cutoff. If empty, sales stop 30 minutes before the event end.
Cover / posterStrongly recommendedNot blocked by validation, but empty art looks unfinished in the app.
Capacity math If Early bird (800) + Door (500) equals 1,300 and Total capacity is 1,000, save will fail. The editor is protecting you from selling seats that do not exist.

Tickets, tables, and extras

Ticket types

  • Use Add type / Add another ticket type. Defaults often include General, VIP, VVIP.
  • Per type: colour, short description, perks (one per line), optional POS tab credit (N$), Valid on day chips.
  • Phases need a Phase name, Price (NAD), and Capacity greater than zero.
  • Phase activation: Starts immediately · Open manually · Activate on date · After qty sold · After % sold · Only during certain hours.

Collapsible extras

  • Tables — bottle or seating packages with capacity, price, quantity.
  • Promos & discounts — promo codes, bulk tiers, payment-method discounts.
  • Event sponsors — tiers Main sponsor / Gold / Silver / Partner / In-kind.
  • Lineup — artists with role, sort order, times, photo.
  • Cashless event — enable wallets for this event.
  • Payment methods — allowlist of what fans can pay with (inherits platform availability).
  • Stalls & merchant spots — stall types, positions, sizes, prices.
  • Merchants & stalls — Add merchants now · Add later · Share invite link.
  • Boost your event — target reach, age range, distance, cities.

Save and publish

  1. Click Create event (or Save changes when editing).
  2. On create, choose visibility in the modal:
    • Save as draft — invisible to fans.
    • Publish now — fans can find and buy.
    • Schedule for later — set go-live date and time.
  3. Confirm with Confirm & create. You land on the event page.

On the Events list you can also Publish now or Schedule a draft without reopening the full editor. A draft with perfect tickets still sells zero tickets until it is live.

Event detail and edit

Path /dashboard/events/[id]. Shows status (Draft / Scheduled / Live), capacity, venue, countdown, Ticket sales pulse, pricing, tables, lineup, discounts, sponsors.

  1. Open View details from the list.
  2. Use Edit event for the full editor (H1: Edit event).
  3. Use Ticket Allocations / Corporate Tickets for paid or hospitality blocks.
  4. Watch sold / remaining / gross revenue under Ticket sales pulse.

Allocations (corporate / hospitality)

Path /dashboard/events/[id]/allocations.

  1. Choose Paid block or Hospitality.
  2. Enter company, point of contact, POC email.
  3. Set admission quantities per ticket type / phase.
  4. For paid blocks, toggle allowed payment methods (or Turn all on).
  5. Confirm with Reserve Tickets & Send Invoice or Reserve Hospitality Block.
  6. Open the block to assign guests, send claim links, or manage the invoice.

Merchants

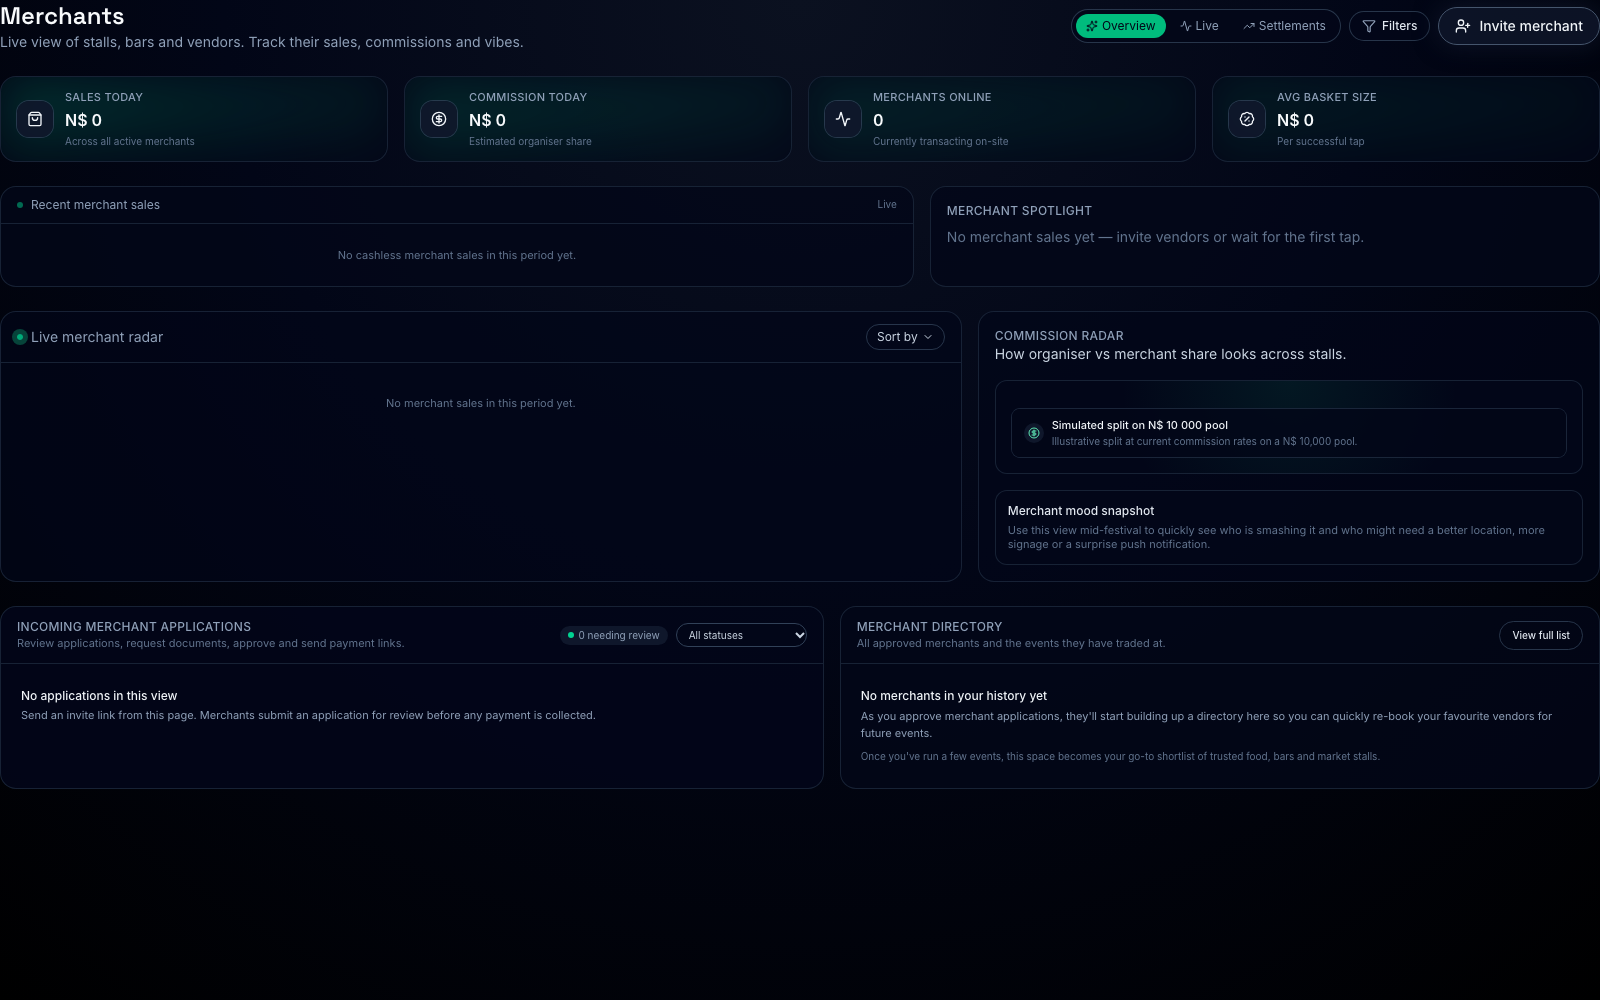
Path /dashboard/merchants. H1 Merchants. Tabs: overview · live · settlements.

Merchants overview with sales and commission cards KPIs Invite merchant
Overview shows Sales today, Commission today, Merchants online, Avg basket size, recent sales, and the applications inbox further down the page.
  1. On overview, review KPIs and Incoming merchant applications.
  2. Per application: View details, Approve, or Decline (rejected / documents required). After approve, send the payment link when you charge a stall fee.
  3. Click Invite merchant — channels include email, link, and directory.
  4. Use live for on-site sales pulse and settlements for payout batches.
  5. Filter applications by status: Pending · Pending review · Documents required · Awaiting payment · Paid · Declined.

Until a merchant finishes activation they are not on the floor, even if you said yes in the group chat.

Analytics

Path /dashboard/analytics. H1 Analytics. Subcopy: Revenue curves, ticket velocity, and gate pressure.

  1. Pick range: 7 days · 30 days · 90 days.
  2. Optionally filter by event chip (All events or a single event).
  3. Read KPIs (Revenue, Tickets sold, Purchases / Avg fill, Avg. order), velocity chart, ticket mix, top events, sell-through and gate panels.

Reports

Path /dashboard/reports. Eyebrow Finance. H1 Decision reports.

  1. Pick a report from the catalogue (examples: Decision brief, Sell-through & pace, Demand curve, Pricing power, Channel mix, Gate operations, Cashless pulse, Refund risk, Money in, Settlements).
  2. Set From / To dates.
  3. Read the insight view; drill into an event when offered.
  4. Export with Download Excel or Download PDF.

Cashless

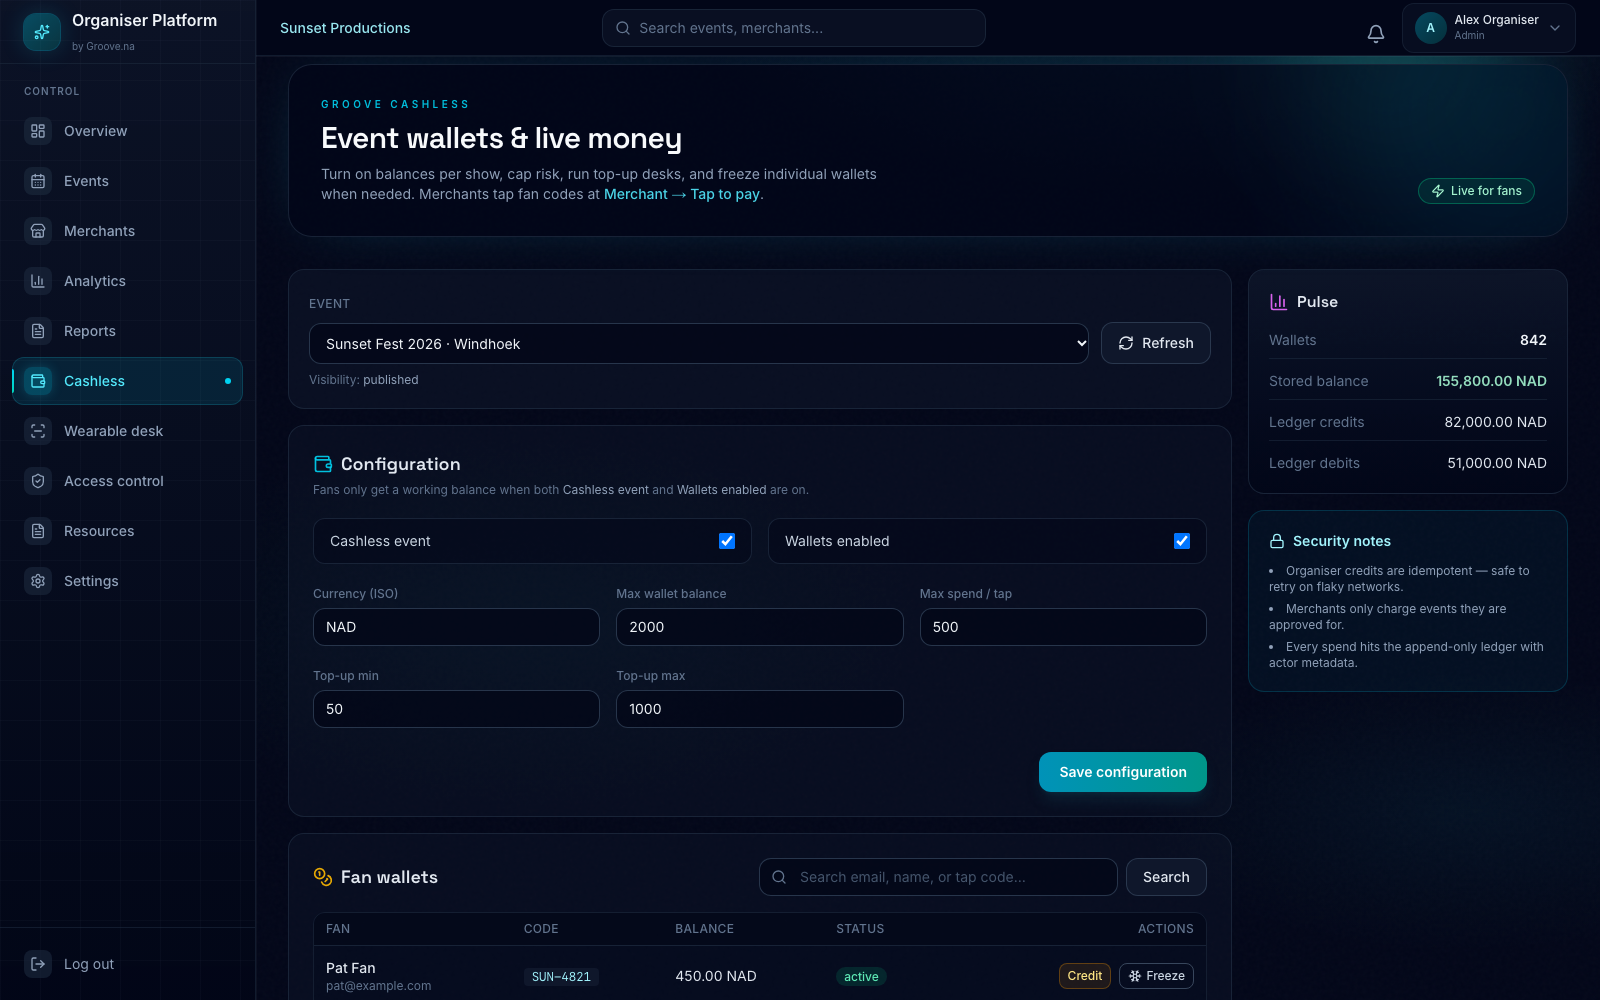
Path /dashboard/cashless. Eyebrow Groove Cashless. H1 Event wallets & live money.

Cashless page with event selector and configuration Event selector Configuration
Pick an event, then set Cashless event + Wallets enabled, currency, max balance, max spend per tap, top-up min/max. Save with Save configuration.
  1. Select the Event (or open with ?event=).
  2. Turn on Cashless event and Wallets enabled. Fans only get a working balance when both are on.
  3. Set Currency (ISO), Max wallet balance, Max spend / tap, Top-up min, Top-up max.
  4. Click Save configuration.
  5. Under Fan wallets, search by email, name, or tap code. Credit, Freeze, or Unfreeze as needed.
  6. Watch Pulse for wallet count and ledger totals. Merchants charge via Merchant → Tap to pay.

Wearable desk

Path /dashboard/wearable-desk. Eyebrow Wearable ops. H1 Wearable desk & staff.

  1. Select the event.
  2. Choose a mode: Link customer · Guest wallet · Top up · Balance check.
  3. Scan or enter wearable / customer codes; set wearable type and optional label.
  4. Under Desk staff, invite operators with Full name, Email, Phone, and Access (Full-time / One event only / Multiple events). They use Groove Terminal with the emailed PIN.
Access control

Path /dashboard/access. Eyebrow Access cockpit. H1 Access control.

  1. Select the event chip.
  2. Open the Configure tab before doors:
    • Zone — Name, Capacity, Zone color.
    • Gate — Name, Zone.
    • Device — Label, Scanner ID, Gate.
    • Rule — which tickets pass, re-entry, supervisor override.
  3. Switch to Live for zones & capacity, gate load, devices, and the incident timeline.
  4. Use lockdown: Normal flow ↔ Locked for new entries when you need a hard stop.

A scanner that was never added as a device will feel broken. It is simply unconfigured.

Resources

Path /dashboard/resources. H1 Resources. Shortcut cards into Events & ticketing, Cashless setup, Wearable desk, Merchant ops, Gate & access, Finance reports. Footer links to Settings and Reports. No API load; pure navigation.

Settings

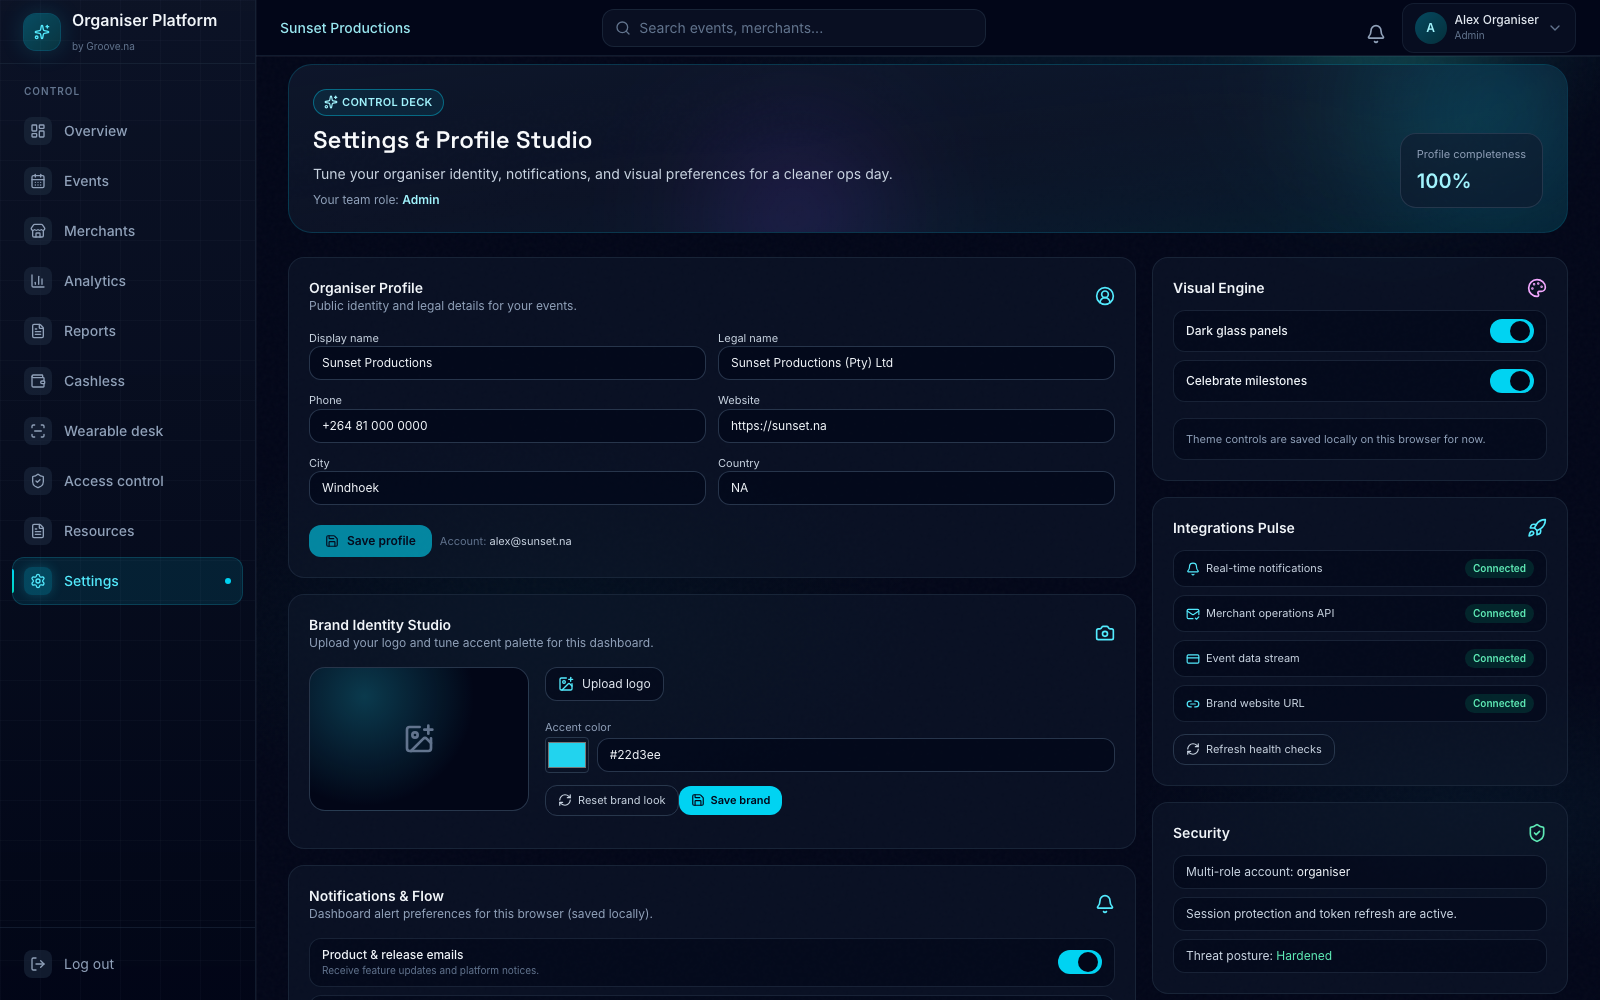
Path /dashboard/settings. Eyebrow Control deck. H1 Settings & Profile Studio.

Settings and Profile Studio Control deck Organiser Profile
Profile fields: Display name, Legal name, Phone, Website, City, Country. Further down: Brand Identity Studio, notifications, team invites, visual prefs.
  1. Organiser Profile — fill Display name, Legal name, Phone, Website, City, Country → Save profile.
  2. Brand Identity Studio — Upload logo, set Accent color → Save brand (or Reset brand look).
  3. Notifications & Flow (this browser) — Product & release emails · Merchant activity alerts · Payment alerts.
  4. Team & Permissions — Teammate name, email, role (Admin / Operations / Finance / Viewer) → Invite. Review Invite statuses. Edit seats then Save team changes.
  5. Visual Engine — Dark glass panels · Celebrate milestones.
  6. Integrations Pulse — health of notifications, merchant ops API, event stream, website. Use Refresh health checks.

Day of the event

Two hours out

Event published, phases correct, cashless on if promised, merchants activated, gates named after real entrances.

Doors

Scanners signed in, a supervisor who can override, wearable desk staffed if bands are live.

During

Watch Overview, Analytics, Merchants live, and Access Live. Freeze a wallet instead of debating a band in the queue.

Close

Stop scans (lockdown if needed), let merchants clear the queue, check settlements, note incidents while people still remember them.

Need the wider map? See the solution handbook (locked) and the merchant handbook for the POS terminal your stalls are holding.

Organiser handbook · October 2026 · Screens from the live Organiser Platform UI